Your Cart is Empty

Firing Base Metal Clay: Did it work?
Cover image and content credit: Julia Jeffree 2019
Firing base metal clays poses a challenge to many who work with metal clay. The primary challenge for most is attaining a "consistent" result. This article is related to a previous post that provides guidance on addressing not only the issue of consistency, but also ensuring the quality of metal post firing.
This content was contributed and is the result of detailed testing and analysis by Julia Jeffree, who although claims the status of "newbie", demonstrates an invaluable wealth of experience in validating and confirming each step in the creative process of working with metal clay.
Julia's approach to test firing (the ONLY way to determine a consistent firing schedule) is not only a testament to her scientific approach, but also provides a wonderful visual of the impacts of various firing schedules. Here is a breakdown of Julias observations.
Note: The brand of metal clay has been removed as the following applies to all low fire metal clays.
JULIAS ANALYSIS OF TEST FIRED BRONZE METAL CLAY

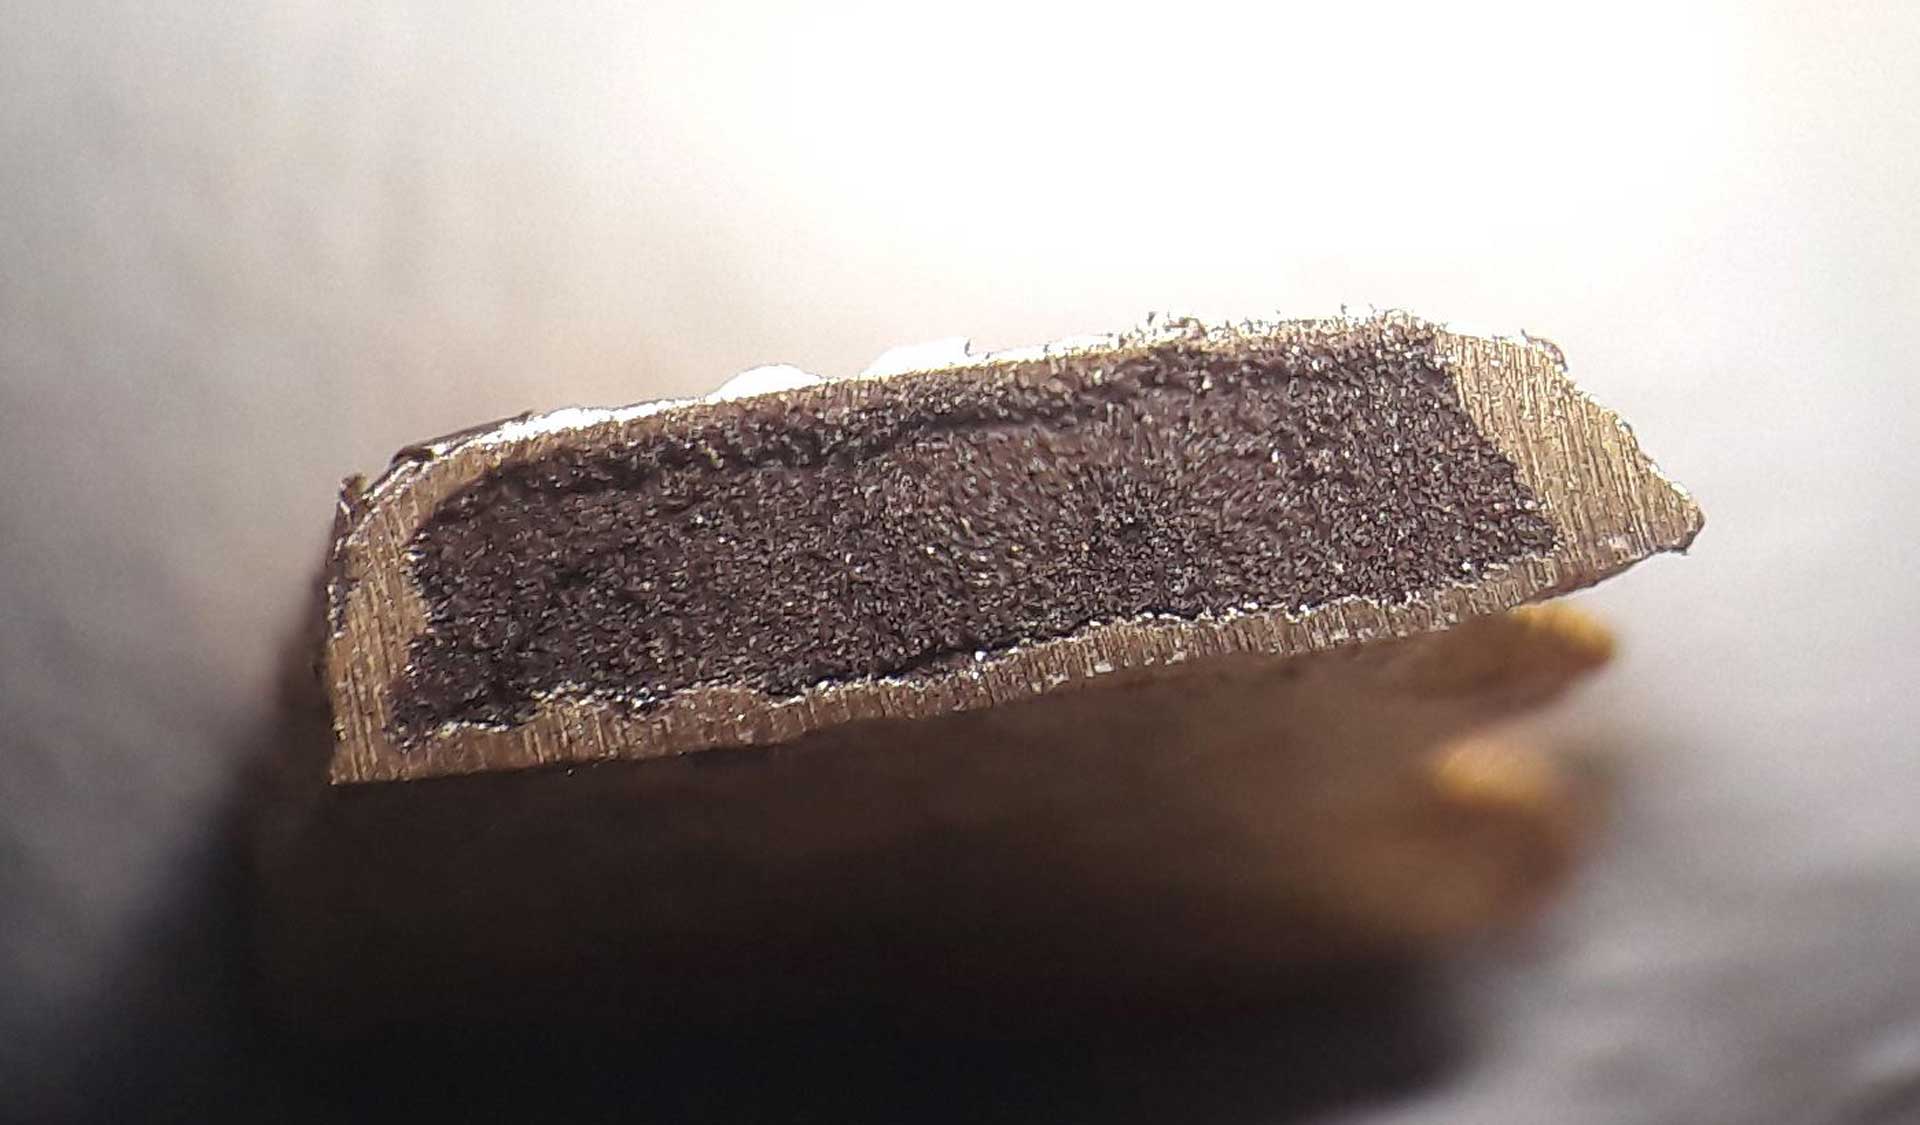
I followed the manufactures recommended two-step carbon firing method (place dried piece in kiln at 500 C for 10 mins, then in charcoal at 820 C for 1 hour). Upon completion, I noticed that the piece did not shrink as much as indicated by the manufacturer. When I cut into the piece, it became evident that it had only partly sintered (see photo). The actual piece was a strip approx. 40 x 5 x 2 mm, you are seeing a cross-section of it in the photo.
IS IT THE KILN?
I checked my kiln performance / calibration using a thermocouple (a very useful tool to validate the performance of your kiln) and found that actual kiln temp is running about 530 C when the controller is set to 500 C. Although the temperature inside the stainless steel charcoal-containing vessel is about 840 C when the controller is set to 820 C, I did not see any indication of binder burn off with the Bronze clay.
Considering Julias' kiln is running a higher temperature than the internal controller indicates, a higher temperature should speed up / enhance the sintering. So the kiln performance can be ruled out.
At this point the manufacturer proposed that the issue was with the "shelf life" of the activated coconut carbon being used. This is an interesting response considering that we re-use activated coconut carbon for over a year with nearly weekly firings.
IS IT THE ACTIVATED COCONUT CARBON?
Thankfully, instead of investing time and money on replacing her activated carbon, Julia proceed to test this claim. Using the same activated carbon, she proceeded to validate;
-
The manufacturers recommended firing schedule
-
The impact on varying the temperature and times
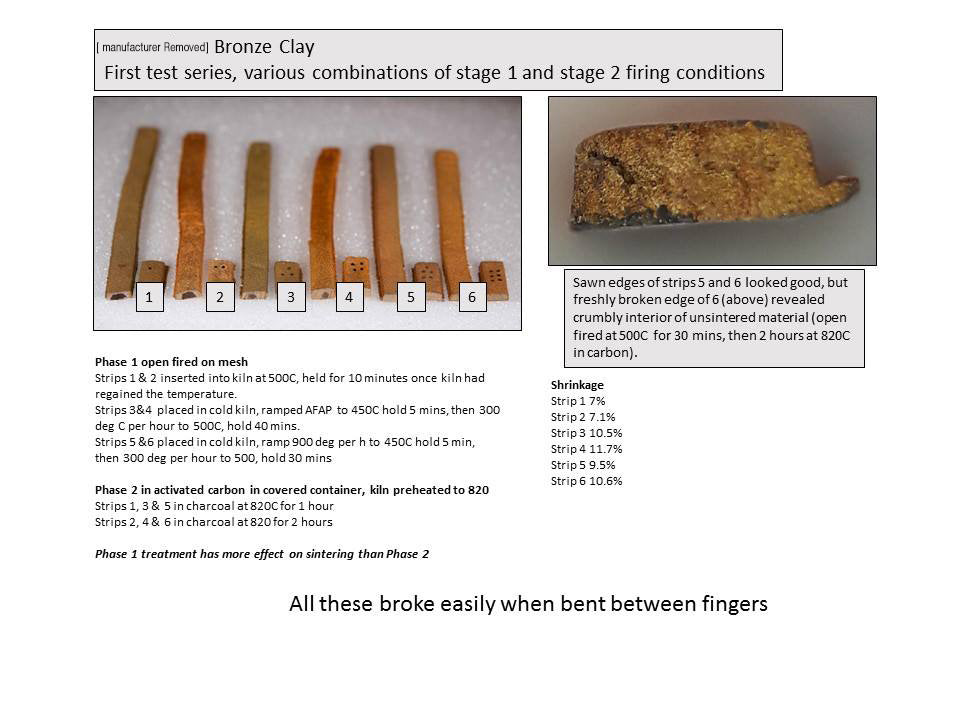
The instructions in the packet say : Stage 1. Place dried piece on stainless steel mesh in a pre-heated kiln at 500 C, for 10 minutes. Allow to cool. Stage 2. Then place the piece into container with activated carbon. Pre heat the kiln to 820 C, put the container in the kiln, wait for the temperature to return to 820 and fire for 1 hour.
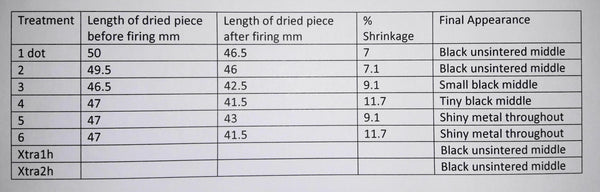
I prepared 6 test strips, each 1.25 mm thick x 5 mm wide x 50 mm approximate length. I tested 3 different approaches to firing: 1 stage firing and 2 different 2 stage firings.
Stage 1 variations a. Followed the instructions in the packet b. Put the pieces into a cold kiln, raised the temperature to 500C, held for 15 minutes c. Same as ‘1b’ but held the temperature for 30 minutes
Stage 2 variations a. Followed the instructions on the packet fire 1 hour b. Same as ‘2a’ but held for 2 hours
Treatment code indicated by number of dots on the strips (see photo) 1 dot = 1a+2a 2 dots = 1a+2b 3 dots = 1b+2a 4 dots= 1b+2b 5 dots= 1c+2a 6 dots= 1c+2b
I also placed strips which had previously been fired using the combination of 1a and 2a, into carbon again for 1 or 2 hours to see if their condition could be improved, called Xtra 1h and Xtra 2h

CONCLUSIONS
- For these pieces which were 2.5 mm thick, 10 minutes at stage 1 is too short, irrespective of the duration of stage 2 .
- 15 minutes at stage 1 is better.
- 30 minutes at stage 1 is best.
- The greater shrinkage at stage 2 in the 2 hour firing indicates that this is the best and strongest combination.
- There was no improvement in the condition of Xtra 1h or 2h treatments with an additional firing in carbon, which indicates the importance of getting Stage 1 right first time.
Julias tests clearly demonstrate;
-
There was no issue with the activated coconut carbon.
-
A manufacturers recommended firing schedule should only be the starting point in determining YOUR optimal firing schedule.
Based on conclusion #4, you will get a better sense of our "Recommended Firing Times", in this case Bronze would be 4 hours! Julias observation of the impact of the 1st stage ("binder burn-off") is very important. If binders are not completely removed in the 1st stage, then the gases given off by the binders may become trapped and will not be exhausted when covered in activated carbon. This can lead to cracks or bubbles on/or in the finished metal as the gases are forced out of the fusing metal particles.
Determined to find a clear answer to why her Bronze metal clay did not sinter and resulted in such a poor quality of metal, Julia continues the quest.
When I investigated the test strips further (see photos above), I found that even the ones that I previously thought were good, were not, as the metallic appearance of the cut ends of test strips 5 and 6 was due to polishing and smearing by the saw blade. When I broke open these strips they were *not sintered (contained a high level of porosity). I found that 1 hour open shelf firing at 500 C followed by 1 hour at 850 C in carbon was much better and stronger.
* - In order to avoid confusion or conflict, most metal clay manufacturers would state that "Sintering" is complete with the removal of the organic binders. Julias reference demonstrates that this definition should be considered as "incomplete fusing of the metal particles" or low quality metal. This is clearly demonstrated in her images.

Unless you have access to a microscope, you will not be able to confirm the level of quality of metal you are producing using metal clay. Julias insightful images clearly demonstrate why we ardently encourage you to follow the guidance provided in our related post.
The quality of your time, dedication, inspiration and design deserves a quality of metal that at least matches your input. If you sell your creations, then your clients (and the reputation of metal clay) also deserve a high quality metal.
How do I get consistent metal quality from metal clay?
The key points in this post that you should consider;
-
Opinions are never a good substitute for facts! As an Artist, bending or breaking rules is merely part of the creative process. Attempting to bend the laws of physics on the other hand will lead to frustration and possibly the loss of a masterpiece.
-
Unless you develop a rigid process based on YOUR personalized firing schedule, you can expect some interesting results, especially when working with base metals.
-
To attain consistent results, requires a consistent firing process.
A manufacturers recommended firing schedule should only be the starting point in determining YOUR optimal firing schedule
You will find the answer to consistent metal quality along with details on how to establish your firing schedule in our related post:
"How to fire metal clay for high quality metal"
A great big THANK YOU to Julia Jeffree for her wonderful contribution and enlightening images.
Assimilate, Implement & CREATE
Steve
Leave a comment
Comments will be approved before showing up.